Welcome, Guest. Please login or register.
Did you miss your activation email?

Username: Password:
Pages: [1] 2 3 ... 5

Author Topic: New Build, pics and questions  (Read 27054 times)

skorpyd

  • Jr. Member
  • **
  • Offline Offline
  • Posts: 98
  • OWF Brand: Home Built
  • OWF Model: Code name "Woody"
    • View Profile
New Build, pics and questions
« on: January 18, 2013, 05:24:55 PM »

I finally got started on my OWB.  Actually a friend and I are building 2, one for each of us.   The firebox is 1/2 of a 500 gallon propane tank cut down and additional 9" for more water volume.  The water jacket is 1/2 of a 1000 gallon anhydrous ammonia tank.  I wanted to keep things pretty simple and basic.

We are running the flue pipe horizontal out the end and then vertical once outside of the housing.   I figure I will be close to 300 gallon water volume.  This will have a fan forced draft incorporated into the door.

I'm heating about an 1800sf home and will eventually want to heat part of my pole barn with in floor heating.
I'm kind of learning as I go and understand the basics but when it comes down to the actual details I don't have everything figured out yet.

Here are a few of the questions I can think of right now.

Should I run a pipe 3-5 feet into the water jacket for either the feed or return line so that I get better circulation in the tank.   

How do I figure out what pump or pumps I need.

Should the pump be installed on the return side or the feed side.

Is an aquastat better than a thermostat from an electric water heater.

What is the best insulation to use around the water jacket.

The water jacket is about 3/8" thick.   Can I safely drill and tap for fittings for the water level sight glass, and the  thermostat or should I weld in a bulkhead fitting. 

For fittings or pipe that I weld on should I use galvanized or black iron pipe.

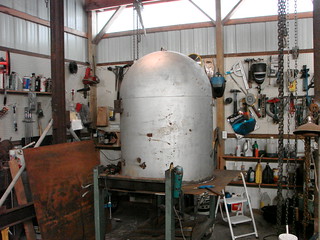
Fire box being welded to front plate


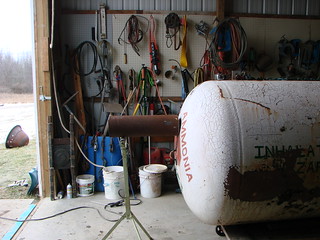
Flue pipe coming out of firebox


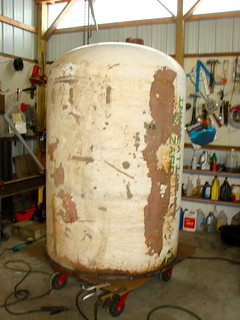
Laying out flue pipe exit from water jacket
[/url]

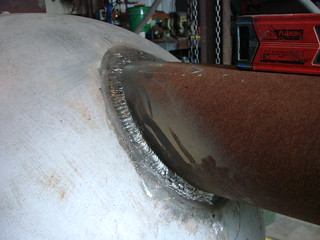
welding water jacket to front plate,  flue pipe coming out of end at top of tank
[/url]

Thoughts, answers and commentary appreciated, Thanks


Logged

dave_dj1

  • Training Wheels
  • *
  • Offline Offline
  • Posts: 49
    • View Profile
Re: New Build, pics and questions
« Reply #1 on: January 18, 2013, 06:34:13 PM »

Good start! I can't answer most of your questions. What I know, I would run one pipe in 4-5' , I wouldn't tap for anything, weld in bungs IMHO, are you going to have a smoke shelf or baffle plate for the stack? I would weld in a plate across the top of firebox almost to the front so the smoke would go to the back, up then to the front and out.  with a secondary air intake.  (just one of my ideas).
Can you add some sort of baffles to the outside of the firebox so the water has to circulate in a certain way? Kind of like a screw. That and they would act as heat sinks.
Anything will heat water, heating it efficiently is the trick. Why burn 20 cords when 10 will do?
I wouldn't use galvanized but make sure you use water treatment.
keep us posted!
« Last Edit: January 18, 2013, 06:42:04 PM by dave_dj1 »
Logged

skorpyd

  • Jr. Member
  • **
  • Offline Offline
  • Posts: 98
  • OWF Brand: Home Built
  • OWF Model: Code name "Woody"
    • View Profile
Re: New Build, pics and questions
« Reply #2 on: January 19, 2013, 04:51:25 AM »

Dave,

Thanks for the ideas.    For my first build I wanted to make it quick and simple as possible.   I had thought about trying to do a baffle system but I went with running the flue horizontal out the end.  The top of the flue is 3 1/2" below the top of the firebox and I also put a 90 degree turn down on the flue pipe inside, so the opening of the flue is actually about 11-12" below the top of the fire box.  I was figuring that this would in effect make a baffle for better heat transfer.   The flue is also running through almost 2' of water on the horizontal plane so I hope this gives good heat transfer.

At this point it's too late to change any of that so I'm hoping it works.
Logged

BoilerHouse

  • Sr. Member
  • ****
  • Offline Offline
  • Posts: 368
  • OWF Brand: Home Built
  • OWF Model: Fire Tube/Water Tube
    • View Profile
Re: New Build, pics and questions
« Reply #3 on: January 19, 2013, 07:01:26 AM »

Good luck with the build skorpyd.  I agree with Dave's suggestions.  Welded black iron fittings is the best way to go.  I personally think you would get better control with an aqustat because the sensing bulb sits in a well which is immersed in water.  Most electric hot water heaters are a surface mount which are probably not the best fit with your fairly heavy shell design.
What I see as being very important - are you allowing good access from each end of your horizontal flue pipe for cleaning?  This area in particular will be very prone to creosote and soot deposits. 
For boiler insulation I used this fiberglass stuff called foundation wrap.  It comes in rolls 4 feet wide x 50 feet and mine was 4 inches thick.  It is foil lined on one side and plastic lined on the other.  I peeled off the plastic (a PITA) and doubled the wraps on the shell. Foil side against shell on first wrap and foil side out on the second wrap.  For the front of the boiler I used a higher tech, higher temp product that came in fairly stiff sheets of 2" x4' x4'.  I am not sure its exact composition.
Hope this helps.
Logged
Muskoka, Ont

dave_dj1

  • Training Wheels
  • *
  • Offline Offline
  • Posts: 49
    • View Profile
Re: New Build, pics and questions
« Reply #4 on: January 19, 2013, 02:05:09 PM »

Two feet is a long way for a smoke pipe through water! Maybe you could make the fire box closer to the water jacket with less water in the rear so you would only have about 6-8" of smoke pipe in the water?
I think spiral fins on the outside of firebox would help heat transfer more than anything and give your water a path so to speak.
Logged

Scott7m

  • Hero Member
  • *****
  • Offline Offline
  • Posts: 3740
  • OWF Brand: Heatmaster
  • OWF Model: E Series
    • View Profile
Re: New Build, pics and questions
« Reply #5 on: January 19, 2013, 02:52:24 PM »

As far as aqua stats, yes that's a must.  Even though you want to stay cheap, you want it to work properly.

The pump should be on the supply side, where your return enters the firebox and exits is very important.  Circulation inside the firebox may sounds silly, but I've seem home made designs boil water in the front and be cool in the back and such.

As far as your pump, much more info is needed to properly size you a pump.  We need to know the distance, what kind of heat exchangers, elevation change, size of pex, lots of factors!

I am all for people building there own and being self reliant, that's great.  Just as importantly though is having the system work correctly, a system not working right will cause one issue to cause another, good luck in your build! 

Oh and as far as insulation, fiberglass is the way to go! R30
Logged
Dealer for:  Heatmaster, Empyre, Earth, Ridgewood, and Woodmaster outdoor furnaces
Furnace Parts Dealer
Pelican water treatment systems
606-316-9697

skorpyd

  • Jr. Member
  • **
  • Offline Offline
  • Posts: 98
  • OWF Brand: Home Built
  • OWF Model: Code name "Woody"
    • View Profile
Re: New Build, pics and questions
« Reply #6 on: January 19, 2013, 05:14:21 PM »

Thanks all for the ideas.

I am planning on having a clean out on the end of the horizontal pipe on the outside.

Consensus is use the aquastat.

I am planning on extending either the inlet or the outlet into the tank for circulation.  I am leaning towards extending the inlet or return line at the bottom of the water jacket the 5' into the tank and the outlet or feed/hot line near the top of the tank to just be a close bulkhead fitting.  Unless there is a reason to do it the other way. 

I will have to do more figuring on installation details.   My run to house is 65-75' then another 40 inside basement to furnace,  I need about a 19x20 or 20x20 heat exchanger.    Considering using 1" pex-al-pex.   Fairly level ground boiler site to house, except for the 48" apx trench depth.

Logged

Fourced

  • Jr. Member
  • **
  • Offline Offline
  • Posts: 52
    • View Profile
Re: New Build, pics and questions
« Reply #7 on: January 19, 2013, 07:27:24 PM »

Two feet is a long way for a smoke pipe through water! Maybe you could make the fire box closer to the water jacket with less water in the rear so you would only have about 6-8" of smoke pipe in the water?
I think spiral fins on the outside of firebox would help heat transfer more than anything and give your water a path so to speak.

I disagree on the length of stack in the water, I have around 4 feet of horizontal pipe in the water with no issues at all.
Logged

Scott7m

  • Hero Member
  • *****
  • Offline Offline
  • Posts: 3740
  • OWF Brand: Heatmaster
  • OWF Model: E Series
    • View Profile
Re: New Build, pics and questions
« Reply #8 on: January 19, 2013, 07:35:55 PM »

What's the benefit of using pex al pex?  Are you going to make this boiler pressurized? 

On your trench depth, don't think deeper is better, it may not show up on the surface as much in snow melt, but you could be hearting the ground the same though.  Typically the deeper you go, the wetter the soil, when you do that, wet soil pulls off heat faster than dry soil.  When I'm trenching if I start seeing mucky wet soil, I don't go any deeper.
Logged
Dealer for:  Heatmaster, Empyre, Earth, Ridgewood, and Woodmaster outdoor furnaces
Furnace Parts Dealer
Pelican water treatment systems
606-316-9697

willieG

  • Hero Member
  • *****
  • Offline Offline
  • Posts: 1852
  • owbinfo.com
    • View Profile
Re: New Build, pics and questions
« Reply #9 on: January 19, 2013, 08:05:20 PM »

scott whaat would the price difference be, between 1 inch pex ala pex, regular 2 inch pex and regular 1.25 pex  i am wondering if 1 pex ala pex is comparable to reg 1.25 pex
1 inch regulat pex is ID .862 .....1.25 regulat pex is ID 1.054 and 1 inch pex al pex is ID 1.014
if the price difference of the pex ala pex is cheaper than the  regular 1.25 it may be worth while using it as the flow is rated on charts i have found as

1 inch reg pex  max 7.5 GPM
1.25 reg pex max 11.2
1 inch pex ala pex max 10.4

depending on pricing there may be an advantage using the pex ala pex as GPM is largely increased over the 1 inch reg pex and there is minimal expansion of any piping out of the earth (not to mention a smaller ump could likley be used with the pex ala pex

of course this has to be weighed against the prices of the pipes
Logged
home made OWB (2012)
Ontario Canada

Scott7m

  • Hero Member
  • *****
  • Offline Offline
  • Posts: 3740
  • OWF Brand: Heatmaster
  • OWF Model: E Series
    • View Profile
Re: New Build, pics and questions
« Reply #10 on: January 19, 2013, 08:14:26 PM »

You are correct in that it does flow better...   But as you know sometimes people get the crazy idea that pex al pex doesn't lose as much heat and other forum myths. 

For example my basic line prices are $5.39/ft for 1" pex triple wrap, it's a quality 3 wrap, not average stuff
1" pex al pex 3 wrap would be $6.23/ft

Folks often don't realize the primary reason for pex al pex is an oxygen barrier to keep o2 out of pressurized systems where treatment isn't used.

As far as pump sizes, you could potentially use a smaller one, but I just kinda figure that up after I know all the details..
Logged
Dealer for:  Heatmaster, Empyre, Earth, Ridgewood, and Woodmaster outdoor furnaces
Furnace Parts Dealer
Pelican water treatment systems
606-316-9697

skorpyd

  • Jr. Member
  • **
  • Offline Offline
  • Posts: 98
  • OWF Brand: Home Built
  • OWF Model: Code name "Woody"
    • View Profile
Re: New Build, pics and questions
« Reply #11 on: January 23, 2013, 04:59:16 PM »

Progress update:

Drain fitting on bottom


Hillbilly engineering


End plate view


Door frame cut


Door frame


Flue pipe saddle


Next is ash removal door, welding on flue pipe, drilling and welding bungs for feeds and returns, and for sight glass and aquastat.  Welding frame for exterior, figuring out best way to plumb and wire.
Logged

martyinmi

  • Hero Member
  • *****
  • Offline Offline
  • Posts: 541
  • OWF Brand: Portage and Main
  • OWF Model: Optimizer 250
    • View Profile
Re: New Build, pics and questions
« Reply #12 on: January 23, 2013, 08:53:11 PM »

Looks awesome!

Tim Allen would be so proud of your metal cutting tool selection- even more so if you had it powered by a Hemi! :thumbup:
Logged
Newholland TZ-25da
30+ Chain Saws
'05 Dodge Diesel
Michigander
TSC 35 Ton Splitter

skorpyd

  • Jr. Member
  • **
  • Offline Offline
  • Posts: 98
  • OWF Brand: Home Built
  • OWF Model: Code name "Woody"
    • View Profile
Re: New Build, pics and questions
« Reply #13 on: January 24, 2013, 03:50:00 AM »

Thanks Marty,  you can do a lot with a Partner saw and a cutting torch.
Logged

Scott7m

  • Hero Member
  • *****
  • Offline Offline
  • Posts: 3740
  • OWF Brand: Heatmaster
  • OWF Model: E Series
    • View Profile
Re: New Build, pics and questions
« Reply #14 on: January 24, 2013, 07:26:21 AM »

Looking good
Logged
Dealer for:  Heatmaster, Empyre, Earth, Ridgewood, and Woodmaster outdoor furnaces
Furnace Parts Dealer
Pelican water treatment systems
606-316-9697
Pages: [1] 2 3 ... 5