Welcome, Guest. Please login or register.
Did you miss your activation email?
Show Posts
This section allows you to view all posts made by this member. Note that you can only see posts made in areas you currently have access to.
Pages: [1]
1
Equipment / a word on chain sharpening....
« on: August 25, 2012, 11:17:54 AM »
I seem to find more and more miss information on how to sharpen your chainsaw chain the farther I read through this section and feel I must say something before someone does something to hurt them selves or others....
First and foremost, an electric sharpener properly set up is far more efficient and accurate than hand filing. Hand filing does not hold consistent tooth lengths nor does it hold consistent angles. If your going to hand file properly you must carry a calipers and verify that each tooth is exactly the same length. Within thousanths of an inch. The throat and chisel angles are very critical to proper fiber severance and chip removal and only the most complicated of fixtures can duplicate a properly dressed sharpener wheel.
If you find that a freshly sharpened chain does not cut well first measure the length of the teeth from chisel point to back and ensure they are all the same length.
If they are the same length check that your not cutting too shallow or deep, as the angle of approach is everything.
If your chain dulls very quickly your cutting to shallow. Your making the cutting surface to long and thin and it is wearing or chipping off. For reference, I can cut approximately 4 hours continuously through hard oaks and hickory when we are clearing sections of land as long as I don't find any rocks or dirt or fence posts. That's approximately 8-10 cords of fire wood. Yet the chain isn't truly dull, but the saw is working harder than I would like. As long as the rakers are at the proper height and you never force a cut a chain will stay Sharp for a very long time if properly sharpened.
As far as rakers go.... Well there is so much misinformation is makes my stomach turn with visions of cut up legs and bodies. Raker depth is crucial to a fast clean cut. More is not better. Yes, manufactures make recommendations based on intended use, but the biggest factors are chain pitch, saw size, and type of wood being cut. A small saw with a safety chain will cut best with a .025" Raker depth. But a large saw, say 70cc or more with a 3/8 pitch chain cutting through soft wood may cut better at .035" Raker depth. Yet will cut better through hardwood with a .030" or even .025" Raker depth. The harder the wood the less of a bite you want to take. But with less of a bite you will still cut through the wood at the same speed because with a large bite your cutting teeth are skipping over the wood more than digging in. There is more load on the bearings and clutch, and you are wearing the tie straps because the teeth are being forced to "lean back" under the heavy load.
If your saw seems "grabby" then you took too much off the rakers and have a very very dangerous situation. Brute strength to hold the saw in a cut is ignorance at best. The saw could pull right out of your hand and land on you, not good.
This is a very rough over view but I feel the need to bring these poor and dangerous practices to attention.
The key points to a good cutting chain saw are this:
Keep teeth at equal length and proper angles.
Keep rakers at proper depth.
Keep proper chain tension and oil chain well.
Contrary to popular belief professionals do not file down the rakers for a faster cut. As a matter of fact some of the fastest saws use a very shallow Raker depth. The key to a fast cut is all the above + chain speed. A faster moving chain will remove more material faster, even with less material removed per tooth. For example, my 45cc tanaka with an 18" bar will travel through a piece of 16" oak faster than my 65 cc husqvarna will with the same length bar and same 3/8 pitch full comp. Full chisel chain. This is because the tanaka is turning at 14,000 rpm while the husky is only turning at 8,000 rpm. The chain moves slower even with the bigger saw so it moves through the piece of wood slower.
But there are ways of changing the chain speed and the options are numerous. The easiest, but not necessarily the best when done alone, is to put on a different rim or spur sprocket with more teeth. The teeth are commonly referred to as pins. If you have a 7 pin then put on an 8, you'll notice the difference immediately. But the problem is your saw might not have enough power for this. It's just like changing sprockets on a motorcycle or dirtbike.
If your saw is equipped with a safety chain you can switch it to a full chisel, that will make a noticeable difference. But beware of kickback.
If your really ambitious and have mechanical skills you can gut your muffler and retune your carb. As long as you don't have a limited ignition coil you will gain a substantial amount of rpms by letting the motor breath easier and gain power which may allow a larger sprocket and even higher gains in cutting speed. But keep in mind that the carb must be properly tuned so you don't burn out the piston or cylinder and you could void a warranty.
These are the methods the pro's use. Make more power and more engine speed and gear up the sprocket to utilise that power. I own a 95cc husqvarna that usually totes a 42" bar turned by a 7 pin sprocket. Not the fastest cut but pulls through a long cut. Once in a while I find the need to put on a 20" bar and turn the 3/8" pitch full comp chisel chain with a 9 pin sprocket, runs through hardwood like a knife through butter. Last time I timed a cut on a 18" dia. Piece of 2 year seasoned white oak it averaged about 4 seconds a cut, and all I had was a normal off the shelf Oregon chisel chain and the rakers where only at .025"
Back to the original point. use the files to touch up in the field, use a proper sharpener when the day is over to restore your chain to its proper shape. I've compared the harbor freight unit to a $200 namebrand unit and the chain cuts just as well. So for the cost of a summer worth of files you can have an electric grinder that will most likely last for quite a few years. Because if you sharpen properly, you will do it less.
2
Fire Wood / I get paid to heat my home!
« on: August 24, 2012, 05:32:17 PM »
Following the family tradition. Our family company is called "careful climbers tree care" We specialize in dangerous and complicated pruning and removal. Our company consists of my father, brother, cousin, and myself.
We normally would have charges $1200 for this removal of a storm damaged tree, but the gentleman was older living on a fixed income and recently had his bladder and prostate removed due to cancer so we did our good deed and worked in Exchange for the wood only.
This is early on a Sunday morning, the day before we where rained out only an hour in.
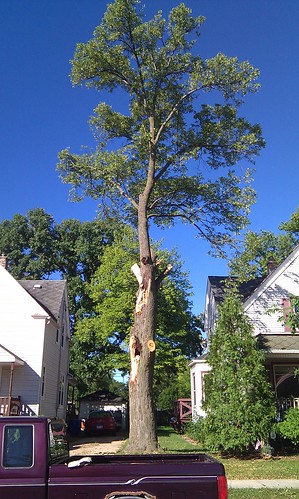
IMAG0926 by Quicksilver99, on Flickr
An hour of setting up rigging and less than an hour of work later....

IMAG0927 by Quicksilver99, on Flickr
And a half hour after that.... Husky 395xp with 38" bar.... Still had to cut from both sides... And that's my dad suffing his face chatting with the homeowner while we take a lunch break...
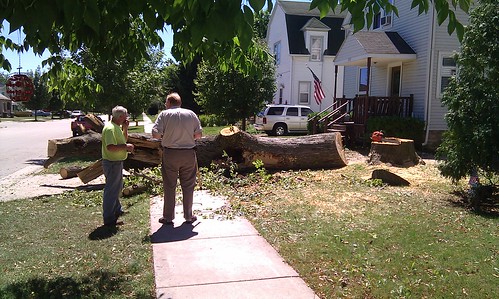
IMAG0928 by Quicksilver99, on Flickr
I'm currently a welder and we all have full time jobs but do this on the side. My cousin is a board certifies master arborists, my brother is a municipal certified arborist, and I am currently working on my climber certification.
In five hours work we had reduced a 65' tall oak and hauled home 5 cords cut and split, and left the yard as though there was never a tree there.
Trimming a limb off grandmas maple where it grew around the power lines...
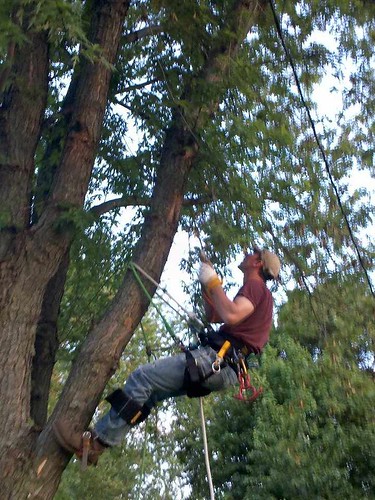
318130_3243326369566_1459052591_32386727_1837321874_n by Quicksilver99, on Flickr
I only use spurs on wood that is being removed. I use a split tail system, distel hitch, puma saddle on poison hivy roap.
We normally would have charges $1200 for this removal of a storm damaged tree, but the gentleman was older living on a fixed income and recently had his bladder and prostate removed due to cancer so we did our good deed and worked in Exchange for the wood only.
This is early on a Sunday morning, the day before we where rained out only an hour in.
IMAG0926 by Quicksilver99, on Flickr
An hour of setting up rigging and less than an hour of work later....
IMAG0927 by Quicksilver99, on Flickr
And a half hour after that.... Husky 395xp with 38" bar.... Still had to cut from both sides... And that's my dad suffing his face chatting with the homeowner while we take a lunch break...
IMAG0928 by Quicksilver99, on Flickr
I'm currently a welder and we all have full time jobs but do this on the side. My cousin is a board certifies master arborists, my brother is a municipal certified arborist, and I am currently working on my climber certification.
In five hours work we had reduced a 65' tall oak and hauled home 5 cords cut and split, and left the yard as though there was never a tree there.
Trimming a limb off grandmas maple where it grew around the power lines...
318130_3243326369566_1459052591_32386727_1837321874_n by Quicksilver99, on Flickr
I only use spurs on wood that is being removed. I use a split tail system, distel hitch, puma saddle on poison hivy roap.
3
Home Made / Start of ultra high efficiency gasifier boiler build
« on: August 21, 2012, 07:58:38 PM »
****The following images are the property*****
Of Peachy Custom Stainless, they are not to be reproduced or reused for any other reason than personal use or learning purposes. They are not to be used for for financial gain, scaling or design purposes, or any other purpose other than descriptive of the objects displayed. Any use must be authorized by written permissions given by Peachy Custom Stainless. Any design resemblance to any existing product is purely coincidental and only a direct result of common manufacturing processes and all ideas hereafter are the sole property of Peachy Custom Stainless.
Well the sky is the limit here, going to have a secondary condensing heat exchanger after I have it running and can collect some data to use for design. Initially it will be a forced draft but once the condensor is functioning it will be induced draft.
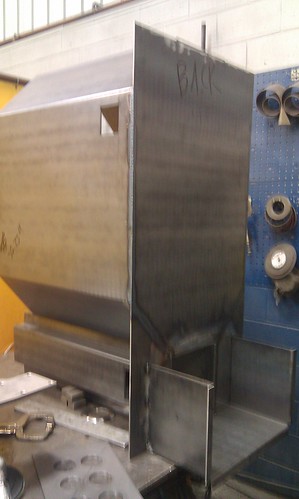
Primary chamber formed up and tacked to formed up secondary chamber
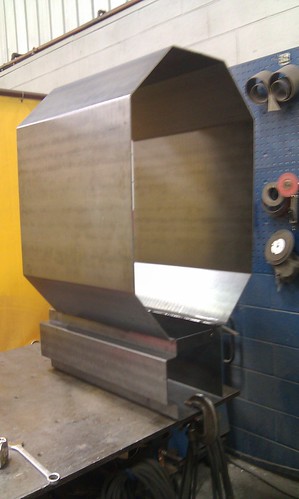
Back view primary tacked to secondary. by Quicksilver99, on Flickr
Back welded on, air inlet plasma cut out of both chambers and exchanger pipe lower box tacked on.
IMAG0943 by Quicksilver99, on Flickr
Exchanger plate punched and welded in place. 8 tubes, 2.375" od with .140" wall at 40" long. The plate is 1/4" thick, knocked it out on a strippit cnc punch on my lunch break.
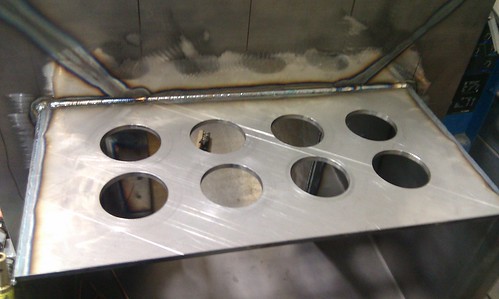
IMAG0944.jpg by Quicksilver99, on Flickr
Of Peachy Custom Stainless, they are not to be reproduced or reused for any other reason than personal use or learning purposes. They are not to be used for for financial gain, scaling or design purposes, or any other purpose other than descriptive of the objects displayed. Any use must be authorized by written permissions given by Peachy Custom Stainless. Any design resemblance to any existing product is purely coincidental and only a direct result of common manufacturing processes and all ideas hereafter are the sole property of Peachy Custom Stainless.
Well the sky is the limit here, going to have a secondary condensing heat exchanger after I have it running and can collect some data to use for design. Initially it will be a forced draft but once the condensor is functioning it will be induced draft.
Primary chamber formed up and tacked to formed up secondary chamber
Back view primary tacked to secondary. by Quicksilver99, on Flickr
Back welded on, air inlet plasma cut out of both chambers and exchanger pipe lower box tacked on.
IMAG0943 by Quicksilver99, on Flickr
Exchanger plate punched and welded in place. 8 tubes, 2.375" od with .140" wall at 40" long. The plate is 1/4" thick, knocked it out on a strippit cnc punch on my lunch break.
IMAG0944.jpg by Quicksilver99, on Flickr
4
Site Suggestions / does this sight allow embeded code?
« on: October 14, 2011, 04:09:35 PM »
More specifically, embedded code as in pictures hosted by an image hosting website? I have quite a few floating around some safe locations on the net of my burner build and would like to start its own thread but the hassle of downloading them back to the computer and loading them onto this site could prove to be tedious. I'd also like to make my footprint on the server as small as possible for the sake of future growth in our populous.
5
Home Made / A Collection of information: Combustion, gasification, wood heat and boilers.
« on: October 13, 2011, 02:56:04 PM »
Well this is going to be exactly what the title says. I've spent the last three years feverishly studying wood combustion and boiler design. I have countless notebooks full of information that I have collected and I wish to share it with all of you. I think that the home built section of this forum is the best place for all of this as it can be used when designing your own OWB. One thing I want to mention from the get go... I spend most of my internet time on an Android phone because of the portability and ability to jump online in my spare time as I usually don't have time to sit at a computer. So please bear with me when it comes to spelling and grammar. Auto correct is much a downfall as a blessing. I will add to this in bits and pieces as time permits. And as this begins to grow, hopefully admin or mods can reorganize it into something nice for everybody. As the information I have to share can be of use to all solid fuel heating devices we discuss here, of all brands. I will site sources when I can, but most all or what I have is from hand written notes. I can assure you though that it is all available online in a simple Google search. With that being said, here we go 
Pages: [1]