Welcome, Guest. Please login or register.
Did you miss your activation email?
Show Posts
This section allows you to view all posts made by this member. Note that you can only see posts made in areas you currently have access to.
1
Home Made / Re: Start of ultra high efficiency gasifier boiler build
« on: July 23, 2013, 08:47:21 AM »
Just an update
Two of the three burners have been put into use. The first one is running excellent, the owner finished winter still learning about gasification but is well on his way to success. The second one had a literal meltdown as the owner tried to tend to it while intoxicated and made a few mistakes that led to a chimney fire and damage. He is on his own now...
I haven't been able to finish mine yet. I need to get the shed it is going in finished first then finish construction of the burner in place. My baby bobcat only has a 2000 lbs limit and with it in the condition of the latest pictures it weighs about 1600 pounds. Water jacket, frame, insulation, and sheathing will put it close to 2800 lbs calculated. So mine is sitting in my pole building waiting for the next step. I do have some pics of the running units to post up when I get a chance.
We welcomed our son into the world back in march so he has been keeping me plenty busy also and I don't get to play in the shop as often but these are moment I wish to not miss. I'll document progress when I get back into it again. I still plan to share this with everybody.
2
Home Made / Re: gasr' build questions.
« on: November 14, 2012, 09:45:25 PM »
83.177 cubic feet of fresh air to 1 pound of wood for complete combustion.
Primary air to secondary air is 1:5 respectively
All wood grows at different densities, but the accepted btu value of wood her pound is 8600.
6880 btu per pound at 20% moisture content, which is the ideal moisture content for a gasifier.
Primary air to secondary air is 1:5 respectively
All wood grows at different densities, but the accepted btu value of wood her pound is 8600.
6880 btu per pound at 20% moisture content, which is the ideal moisture content for a gasifier.
3
Home Made / Re: gasr' build questions.
« on: November 14, 2012, 12:52:35 PM »
By flue I'm going to assume that you are talking about the heat exchanger tubes (Hx from now on). The flue is actually just the chimney portion. As long as your cross sectional area of the combined Hx tubes are reasonably close to the flue area you won't have a problem. Now I have to ask, are you forming the heat Exchange tubes? Why not use pipe? Also, keep in kind that the heat exchanger is the area of major wear on any boiler. The tubes erode on the inside from the hit gasses and comrade on the water side from the changes in temperature. Industrial boilers use special tubing but for us pipe is fine. The idea is to make replacement as easy as possible. Round shapes also take heat expansion better, and pipe is anealed so there are no points of stress within the structure. Also keep in mind that you will have to clean them regularly to get the best efficiency.
As far as calculations, they are all quite simple and short.
Btu/hr requirements translate into lbs/wood burned
Lbs/hr wood burned translated into cfm air needed
Cfm air translates into cross-sectional area of hx tubes and flue diameter
Hx tubes should be somewhat more area than flue diameter, as the gasses are heated, Charles law explained that volume will decrease as they cool. Therefore will require less area after the hx. Theoretically, if your hx cools all the way back to ambient temp, the flue must only be as large as the fan inlet.
4
Home Made / Re: gasr' build questions.
« on: November 14, 2012, 07:26:28 AM »
Forced draft can be as forgiving as it can be finicky I have found. you can push, but only so hard before gasses push back. Gasses act like a spring. You can cram in more than can escape and you get a back draft situation. I've managed to make my boiler that weighs 1200 lbs, plus 400 gallons of water, dance around like and Irish jig. There are 2 bad situations that can come of this, flammable gasses can push back into the primary chamber and ignite, key word kaboom! Or the sides will flex like a drum, and eventually you will have fatigue failure of the metal. Could you please be a little more specific of what your numbers mean? Are you talking surface area of tubes? Cross sectional area of flue? It would be easier to help if I understood what those numbers where.
5
Home Made / Re: Start of ultra high efficiency gasifier boiler build
« on: November 13, 2012, 09:29:38 AM »
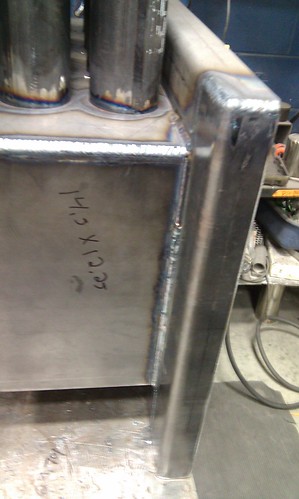
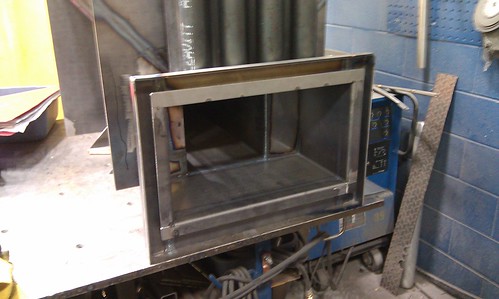
Welded door frame
IMAG0976 by Quicksilver99, on Flickr
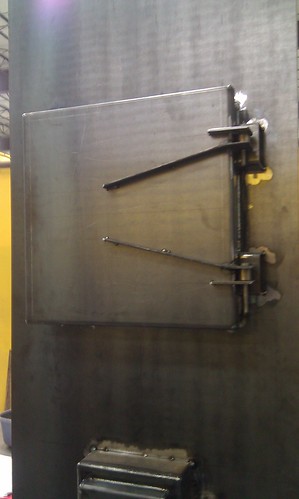
front door hinges
IMAG0970 by Quicksilver99, on Flickr
Secondary door hinge, fully adjustable

IMAG0971 by Quicksilver99, on Flickr
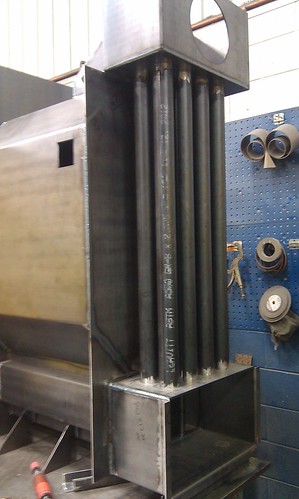
Backing up a little bit here, these are the new plates with the new pipes welded in place. I decided to use turbulators after some calculations and needed the smaller diameter to keep the velocity optimal to prevent fly ash buildup. The 3" pipes would have moved the air to slowly around the circumference as it swirled its way up the tube and the ash would have caked on eventually plugging the tubes.
IMAG0973 by Quicksilver99, on Flickr
IMAG0976 by Quicksilver99, on Flickr
front door hinges
IMAG0970 by Quicksilver99, on Flickr
Secondary door hinge, fully adjustable
IMAG0971 by Quicksilver99, on Flickr
Backing up a little bit here, these are the new plates with the new pipes welded in place. I decided to use turbulators after some calculations and needed the smaller diameter to keep the velocity optimal to prevent fly ash buildup. The 3" pipes would have moved the air to slowly around the circumference as it swirled its way up the tube and the ash would have caked on eventually plugging the tubes.
IMAG0973 by Quicksilver99, on Flickr
6
Home Made / Re: Material Thickness
« on: November 12, 2012, 08:22:50 PM »
I just want to throw this up for the sake of discussion here....
My firebox is lined with 2.5" thick fire brick, all sides, my only direct contact heat transfer is a 3" tall by 36" wide secondary flue pass. About 40" long. Now, when I do my efficiency calculations by weighing the wood I put in and recording the temperature increase in the water over a given amount of time,I actually have a higher rate of heat transfer with the brick than without. Which supports a theory that a firebox made with 1" plate should be more efficient than one of 1/4" plate. The reason here is that even though the heat travels to the water more slowly, it is still being absorbed and eventually transferred through. But, the greatest advantage lies in the fact that I can make a much smaller, hotter, more efficient burn, with less wood, and still make as much or more heat. Because the surface temperatures in the burn chamber are much closer to actual combustion temperature. Now, if it takes an hour for the heat to travel through the bricks, through the metal, to the water, big deal. It takes four hours of burning to store enough heat for twelve hours of use. So, after the 400 gallons of water I have has started to cool, which is probably around the 4-6 hour mark, those bricks are still adding heat. Holding the temperature at a reasonable level for quite some time thereafter. Consider comparing two 9 volt batteries paired as opposed to a deep cycle automotive battery, the two 9v make more voltage combined but the auto battery will run your lil lightbulb for days. Mass storage is key to any regenerative system, be it heat or electricity or whatever. The more storage you have the less of a change there is from start to finish of a cycle and the longer the system lasts as there is less direct load on it. The simplest laws of chemistry and physics are at work here. If, say I build a burner with a firebox that has 8 inch thick walls, the heat will still travel through to the metal at almost the same rate as water, which with steel, is almost instantaneously, the steel will continue to heat until it has reached the phase change temperature of the water, 210 degrees, at with point there will be a gradient established. The steel will continue to heat hotter than the water, potentially all the way to the melting point. But the surface of the metal that is in direct contact with the water will never achieve higher than 210 degrees because the water absorbs the heat. As heat is taken from the water, it is then taken from the metal, the metal slowly cools and continues to do so long after the fire has gone out. Because it was able to absorb more heat than the water, heat that would have been wasted if the wall was only 1/4 thick. But the cool part is that the water temperature could potential remain at exactly 210 degrees for many hours long after there is no fire.
Just a small blurb of late night physics to ponder on. I'm not sure how clear it came across as its far past my bed time.
7
Home Made / Re: waterside paint/coatings?
« on: November 12, 2012, 07:06:19 PM »
The information for this is in my informational thread here:
http://outdoorwoodfurnaceinfo.com/forum/index.php?topic=1182.0
It is because the water gives up all the dissolved oxygen at 180 degrees, and does not re-absorb it until 140 degrees or so. If you keep it above this temp, no oxygen is present in the water to allow corrosion to form.
http://outdoorwoodfurnaceinfo.com/forum/index.php?topic=1182.0
It is because the water gives up all the dissolved oxygen at 180 degrees, and does not re-absorb it until 140 degrees or so. If you keep it above this temp, no oxygen is present in the water to allow corrosion to form.
9
Home Made / Re: gasr' build questions.
« on: November 12, 2012, 12:28:40 PM »
A nozzle that developes a swirl in the secondary is ideal and is what I'm after. The secondary chamber does not need to be round as I have tested this theory. Square actually makes more turbulence which seems ideal. You need to think in terms of CFM with your blower instead if in/h2o to work out the calculations. So that information would be vital to know. Also, might I make the suggestion that you keep all your questions for your build in one thread? If you start a new topic with every question it can make things get very cluttered. I watch for the NEW marker at each thread and check accordingly. Just a helpful thought to pass along to you and others.
10
Home Made / Re: Start of ultra high efficiency gasifier boiler build
« on: November 12, 2012, 12:23:32 PM »
I appreciate the enthusiasm paperman but I don't think that I will be hearing from them again. As I said, they had no or one post listed, and where created the day the PM was sent. I have watched and nothing thereafter elsewhere. There where 5 messages sent on different days, clearly different individuals by the way they wrote, but where all after the same information. And as someone who has worked the engineering side of the patent process before, I know when I'm being approached by a knowledgeable individual who is trying to reverse-engineer something from a picture. There are certain words, engineering lingo so to speak, that are key indicators especially. I'm not trying to blacklist anyone, only preserve what is rightfully mine, of wich I choose to share with all of you.
11
Home Made / Re: waterside paint/coatings?
« on: November 12, 2012, 11:58:09 AM »
Way over thinking my friend, stand pipe and fill it full is the best way. And from my experience, rtv does not hold up..... Just make the top solid.
12
Home Made / Re: Start of ultra high efficiency gasifier boiler build
« on: November 12, 2012, 09:52:09 AM »
As of recent I have received a number of unusual PM's from individuals who have zero post history, asking for design drawings and blueprints. Due to the nature of these messages and their content I strongly believe that these are from individuals looking to make a profit from my design. Some of them are so clear in they're intent its unbelievable.... So I have taken a few precautions to make sure this doesn't happen. I've skewed the drawings so as to make it impossible to scale dimensions from them, I've edited a few critical dimensions from posts to prevent such things, and all these drawing are now filed as property of my design and fabrication business and are considered proprietary information. I find it rather dissapointing that this has happened, as I feel that all of us here are of the same type of creative individuals with some very talented skills among us. I'm not doing this for a profit and I intend to make sure nobly else does, and that unibody else takes this information from us. It should be shared freely as all knowledge should. I only have taken what I have learned and put it into a format that is easy for everyone to understand. So, from this point foreword I will continue as I am, but will do everything I can to keep this as public as it should be, yet be protected under the name of myself so that nobody else can try to take it. Now, should there be any corporate jerkoffs looking for ideas to make a buck around here.... My engineering consulting services go for $65 an hour, I have many large company's in my portfolio to back my knowledge, and I have fabrication services to offer also..... Should you be interested in making money off of this keep in kind ill be looking for my share also....
For all my loyal readers, thanks again for all the kind words. Let the fabrication continue!
For all my loyal readers, thanks again for all the kind words. Let the fabrication continue!
13
Home Made / Re: gasr' build questions.
« on: November 12, 2012, 05:54:33 AM »
The biggest reason for a rear inlet is to keep things simple. Most of us and most manufactures like to have the fan enclosed in the back of the burner with all the other mechanical parts of the burner so everything is packaged nicely and access is easy. If the inlet is in the back then there is less routing and less chance of future failure. As far as a low inlet, this could complicate the process. A high inlet provides two major import aspects.1 Even air distribution around the charcoal bed, or more properly described as the "hearth zone." 2 preheating of the air before it reaches the hearth zone as it passes through the reduction zone. If your air is too cool when it hits the hearth zone it will kill efficiency drastically. Likewise, an uneven distribution of air will cause bridging in The hearth zone and inhibit proper gassification. Bridging is when the coals burn faster then the wood above reduces to charcoal and gassification stops completely. You are on the right track when it comes to secondary mixing, this can be very critical to achieve proper and complete burn, but be wary of too much primary chamber pressure and too much nozzle velocity as this too can cause bridging. Size your nozzle to your heat needs, and make an air flow adjustment for the primary chamber. The ideal nozzle velocity for wood is 33 feet per second. This will determined e how many nozzles and their size. A 48" chamber is not to much, but keep in mind you want all the wood to get to the nozzles on its own so design accordingly. Use gravity here. If you need some help with designing the nozzle or calculations just ask, time is a little tight for me lately but ill be happy to help as much as I can.
14
Home Made / Re: Start of ultra high efficiency gasifier boiler build
« on: November 12, 2012, 04:30:44 AM »
Those units are modeled after the "scotch boiler" and it has its merit, but in my opinion that particular design is better suited for the coal that was burned in those boilers. This boiler will have a second and third pass, as stated in the first post, but I needed to design it as such that when burning with the bypass damper open these dirty flue gasses would not plug up the higher efficiency second and third pass. Only gassification combustion will be allowed to flow through these so there is no condensation of particles on the inner walls to plug them or inhibit efficiency. That will be a separate but attached unit, and is yet to come.
15
Home Made / Re: Start of ultra high efficiency gasifier boiler build
« on: November 02, 2012, 10:13:37 AM »
Made a couple changes which ill elaborate more on later but here's a pic of the progress so far.
IMAG0975 by Quicksilver99, on Flickr
The door frame and water jacket border are all welded up along with the pipe in and welded too. Pipes where a bear to weld...... I changed to a smaller diameter pipe also for many reasons. I'll get into that more but the biggest reason was velocity through the turbulators I'm going to make. Needed more velocity to get the transfer I wanted.